WDT Tools
What is WDT in Coffee?
In the world of coffee, particularly espresso preparation, WDT stands for Weiss Distribution Technique. It’s a popular method for evenly distributing ground coffee inside a portafilter basket before tamping. The goal is to eliminate clumps, create uniform density, and promote even water extraction during brewing, which helps prevent “channeling” (uneven water flow that leads to under-extracted or bitter shots). WDT is a staple for home baristas and pros alike, emphasizing precision in the grind-to-brew process.
History and Origins
- Inventor: Developed by John Weiss, a coffee enthusiast and engineer, in the early 2000s. Weiss shared the technique on home-barista forums like Home-Barista.com around 2003–2004, where it quickly gained traction.
- Evolution: It started as a simple hack using a needle or thin wire to stir grounds. Over time, it evolved with dedicated tools and became a core part of espresso workflows. By the 2010s, it was mainstream, featured in books like *The Professional Barista’s Handbook* by Scott Rao and videos from experts like Lance Hedrick.
- Why “Weiss”? It’s named after its creator, similar to how other coffee techniques (e.g., VST baskets) honor innovators.
Why Use WDT? Benefits
WDT addresses common issues in espresso extraction:
- Even Distribution: Breaks up static-clumped grounds (especially from burr grinders), ensuring no dense pockets or voids.
- Reduces Channeling: Leads to more consistent shots with balanced flavors—no sour under-extraction or bitter over-extraction.
- Improved Yield and Efficiency: Better puck prep means higher extraction yields (typically 18–22% TDS) and reproducibility.
- Versatility: Works with any espresso setup, from lever machines to super-automatics (with manual intervention).
- Data-Backed: Studies and user tests (e.g., on CoffeeGeek forums) show WDT can improve shot consistency by 20–30% in blind tastings.
Drawbacks? It’s an extra step (adds 10–20 seconds), and overdoing it can compact grounds prematurely.
How to Perform WDT: Step-by-Step Guide
WDT is simple but requires a steady hand. You’ll need a WDT tool (more on that below) and your dosed grounds in the portafilter.
1. Dose and Grind: Grind and dose your coffee (e.g., 18g for a double shot) into the basket. Gently tap to settle.
2. Insert Tool: Hold the portafilter level. Insert the WDT tool (a thin probe) vertically into the center, about 1–2 cm deep.
3. Stir in a Pattern: Rotate the tool in small circles (like drawing figure-8s or spirals) while slowly moving it across nds:
Start at the edges and work inward.
– Break clumps by lthe entire surface. Aim for 5–10 secoightly scraping or hooking them.
– Avoid pressing down—let gravity and motion do the work.
4. Level the Bed: Once stirred, use a finger, distributor tool, or the WDT tool’s base to lightly level the surface (no hard tapping).
5. Tamp: Apply even pressure (about 15–30 lbs) with a tamper for a polished puck.
6. Brew: Lock in and pull your shot.
Tools for WDT
You don’t need fancy gear—a paperclip works in a pinch—but dedicated tools make it easier and more consistent:
- Basic: Thin needle, sewing pin, or guitar string (free/cheap).
- Dedicated WDT Tools:
– Motra WDT (by Pullman Barista): Stainless steel needle with a handle (~$15–20). Classic choice.
– Normcore WDT: Ergonomic plastic/metal hybrid with multiple needle options (~$10).
– Lazy Bear WDT: 3D-printed or metal, often with a silicone base for leveling (~$5–15).
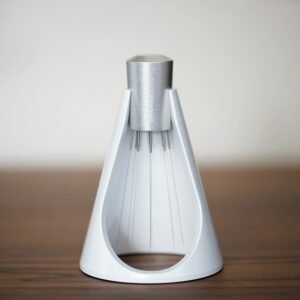
– Sworksdesign WDT (often just called “Sworks”): The current gold-standard for serious baristas. Machined from anodized aluminum with a Delrin (plastic) insert that holds up to 17 needles (though 8–9 is recommended for best coverage without overcrowding).
Why it’s elite:
– Uses the thinnest needles on the market (0.22mm ultra-flexible + 0.25mm stiffer ones).
– Thinner needles don’t “push” grounds around—they gently fluff and separate without creating new clumps (most cheap tools use 0.4mm+ which act more like mini-rakes).
– Alternating needle setup: The insert has two alternating groove sizes, so you can mix 0.22mm and 0.25mm needles in every-other-hole pattern. This gives the perfect balance—flexible ones reach deep into clumps while stiffer ones maintain spacing and prevent the bundle from collapsing inward.
– Typical config: 8 needles around the edge (alternating thick/thin) + 1 slightly bent in the center for stability.
– Built-in magnets on the handle end so it sticks to your grinder, dosing cup, or a metal stand. It also picks up your puck screen.
– Seen in videos by James Hoffmann, Lance Hedrick, and pros worldwide—often credited with turning WDT “non-believers” into obsessives because shots suddenly become 20–30% more consistent.
Price: ~$50–70 USD direct from sworksdesign.com (made by Sheldon in Canada). Often sold out—sign up for restock alerts.
Assembly tip: Needles come separate. Push the coiled end into the grooves (they snap in firmly). Alternate sizes every hole, bend the center one slightly for a snug fit.
– High-End: Espro or Fellow kits with integrated distributors (~$30+); Weber Moonraker (planetary spinning version, $200+).
Many are available on Amazon, Sweet Maria’s, Seattle Coffee Gear, Clive Coffee, or direct from makers.
If you’re pulling more than 2–3 shots a day and hate channeling, grab the Sworksdesign—it’s the one tool that legitimately feels “endgame” for puck prep. Pair it with a magnetic button stand for that satisfying *clack* when you set it down.
Common Myths and Troubleshooting
- Myth: WDT replaces tamping. Nope—it’s complementary.
- Myth: Finer tools always better. Actually, match tool thickness to grind size (thinner for finer).
- Trouble: Still channeling? Check grind size, dose, or machine temp first—WDT isn’t a cure-all.
- Science Angle: Clumps form from electrostatics and oils; WDT disrupts them via shear force.
If you’re diving into espresso, WDT is a game-changer for dialing in shots.
